Setting up our tools, and viewing our first page
First, create a folder for this class.
Please create a folder somewhere on your computer where you can be save assignments for this course. Name it anything you'd like.
Each assignment will be a subfolder in our new class folder. Please create an empty subfolder for assignment 1 now, and call it "assignment-1".
Your folder will end up looking like this:
creative-coding-2022/
    assignment-1/
The rest of the files we create in this tutorial will occur in this "assignment-1" folder.
Text editor
Download and install Sublime Text. There are many other text editors available in addition to Sublime Text (VSCode, Atom) that have lots of helpful features that programmers expect. For example, tabs to edit several files on the same screen, code suggestion/completion, and colorful syntax highlighting. However there's nothing magic about these editors- the default Mac and PC text editors(TextEdit and Notepad) would work too, but they aren't so convenient to use. I chose Sublime Text for this course because it's free, very popular, and works well on both Mac and PC.
If you already have a code editor preference, feel free to use your preferred option. However there may be instances where specific differences between Sublime and your editor might just be a bit confusing.
Set up HTML, CSS, JS Files
Open Sublime Text, and load our empty "assignment-1" folder.
On the left pane, right-click to create a new file. Save it and call it index.html. Most of the time, web sites are kept in folders with one extra-important file, index.html.
If any other files are needed, they are mentioned at some point within index.html.
On the left pane, right-click to create a new file. Save it and call it mystyle.css.
On the left pane, right-click to create a new file. Save it and call it myscript.js.
Copy the empty html template from Lecture 1 into index.html.
We can leave mystyle.css and myscript.js empty for now.
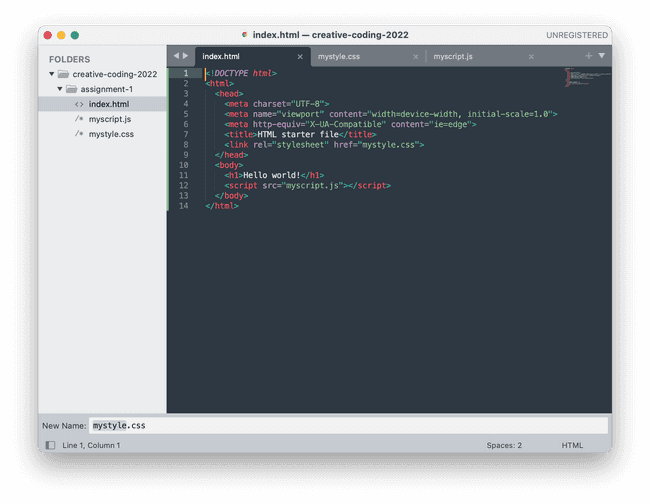
Now your editor should look like this:

Believe it or not, the code in our assignment-1 folder is now ready to go!
Local Web Server / HTTP
Before we can authentically experience our excellent web page as a user, we need to perform one more very important step. Understanding this step will require a bit of background on how websites are actually delivered to users on the internet.
Websites are collections of files sitting on a server. A server is just a computer that is always turned on, and always connected to the internet. A server is where we will eventually need to store our web page to make it public to the rest of the internet.
There a lots of companies that charge a monthly fee in exchange for space on their servers. Hostgator is my favorite and there are lots of others. But that won't be necessary for this course, because luckily for you students, your university supplies you with your own server space! At the end of this tutorial I will show you how to access it.
Anyway, a web server waits and waits for other computers on the internet (maybe your phone, or my laptop) to make different kinds of requests from it. A very common request (probably the most common) that web servers handle is sending webpages to devices.
What does this all have to do with the folder sitting on our computer? Well, we want to view our page as if a real web server is hosting the site in some other place and sending it to us. This is ultimately going to happen once we publish our page. That way, when we like our site, we can just drop the files onto a server and know it will function properly.
This might sound a bit odd, but luckily it's not hard to accomplish this. All we have to do is set up a local web server with a convenient application, which does everything for us!
Set up and bookmark a local web server
Please download and install Google Chrome if you do not already have it already. We will use Google Chrome exclusively for this course, because in my opinion it offers the best developer tools for inspecting and debugging websites.
Open up Google Chrome and install the Web Server for Chrome app.
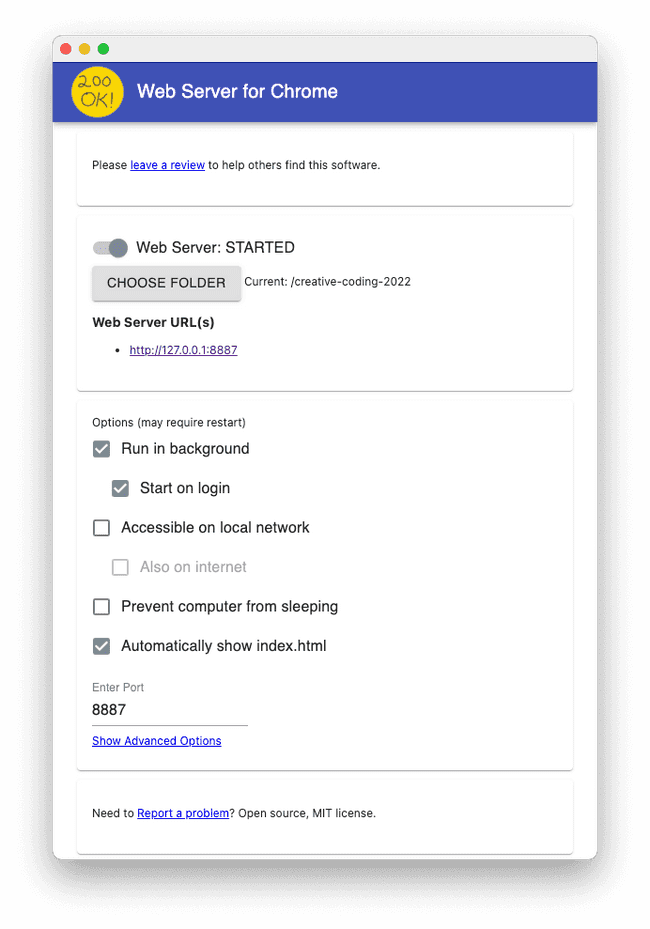
Choose your class folder as the root folder, and match the settings to the settings below.

Once you do so, that means any time you open chrome, it will also start up a local web server at 127.0.0.1:8887.
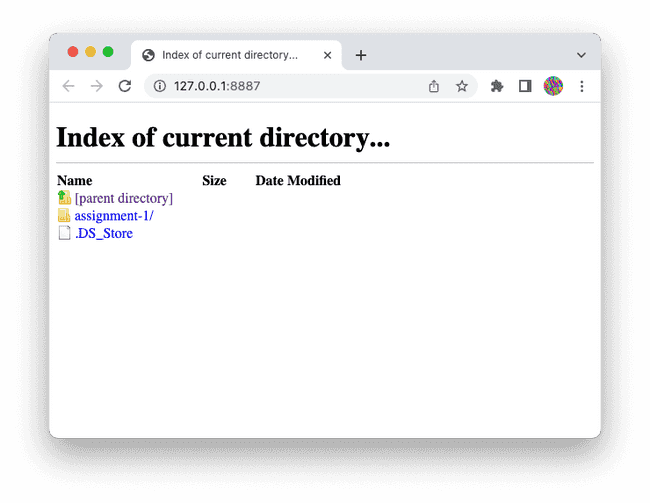
If you navigate to that link, you should see this!

Please bookmark this link, as it is difficult to remember, and save it somewhere you can easily find later.
Now for the exciting part: click assignment-1/, and you should see our web page in action! When you change the files in your editor and refresh Chrome, you will see the changes are reflected. You do not need an internet connection to use this local webserver and test out your site. Everything is happening on your own machine.
Behind the scenes, when we navigated to the assignment-1 directory, our local web server found the index.html index.html.
When index.html is present in a directory, and a user requests the directory from the server as we did here, it will serve it by default to the user.
The server will also send over any other files referenced within index.html, which in our case are mystyle.css and myscript.js.
Chrome Dev Console
Throughout the process of programming web pages, the Chrome Dev Console will be your best friend. To open it, right click anywhere on a webpage and click "Inspect element". The Dev Console will pop up, showing you the element you right-clicked.
There is a ton going on in this window, but in this course we will be using the "Elements" and "Console" tabs exclusively.
The Elements tab lists the "tree" of elements on our page, and lets us inspect the CSS being applied to each. It also lets us make live edits to the HTML and CSS that will remain until we refresh.
The Console tab is our control center for Javascript on the page. It lets us test out lines of code and reports information to us about our JS programs as they run, helping us debug.
There are many many more features that will be uncovered as we move through the course. Don't hesitate to mess around and soak it in.
For an overview of how to use the dev console, refer to this excellent video: https://www.youtube.com/watch?v=wcFnnxfA70g
Use SFTP to publish our site!! (Optional)
Lets say you edit your site a bit, and feel ready to post it online. We need to get onto your "student server" and drop the website files there.
To do this, we need to download an FTP/SFTP program called Cyberduck. FTP and SFTP are protocols that allow you to log onto a web server and dump files onto it, or download files.
Then, I will defer to your school's instructions :)
After you've logged into your server space, you should see a folder called public_html.
This is the root folder for your webpage, so you can drop the contents of your class folder there, and your site will be live.
